Video has become the dominant way people consume information online, and dental practices are no exception to this shift. In 2026, practices that use video consistently are seeing measurable advantages in patient acquisition, trust-building, and search visibility over those relying solely on text and static images.
The barrier to entry has never been lower. You do not need a production crew, a studio, or a five-figure budget. What you need is a smartphone, a basic understanding of what resonates with prospective patients, and the discipline to publish consistently. This guide covers exactly how to get there.
Why Video Matters for Dental Practices
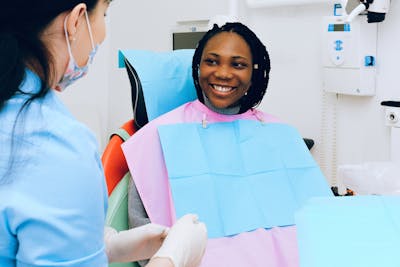
Dental care is inherently personal. Patients are trusting you with their health, their appearance, and often their comfort during vulnerable moments. Text on a website can only do so much to establish that trust. Video lets prospective patients see your face, hear your voice, and get a feel for your practice before they ever pick up the phone.
The data supports this. According to Wyzowl, 63% of consumers say they would most like to watch a short video to learn about a product or service, compared to just 12% who prefer reading a text-based article. For dental practices, this translates directly into how patients evaluate and choose providers.
When a prospective patient finds two practices with similar reviews and services, but one has a warm, professional video tour and the other has stock photos, the choice is predictable. Video creates familiarity before the first visit, reducing the anxiety that keeps many patients from scheduling.
The Trust Advantage
Dental anxiety affects an estimated 36% of the population, with 12% experiencing extreme dental fear. Video is one of the most effective tools for reducing this barrier. When patients can see your waiting room, meet your team, and watch you explain a procedure calmly and clearly, much of the unknown disappears.
This is especially true for high-value procedures like implants, veneers, and orthodontics, where patients are making significant financial decisions. A well-produced explainer video can be the difference between a patient choosing your practice or continuing to shop around.
Types of Dental Videos That Work
Not all dental videos are created equal. The most effective video strategy combines several formats, each serving a different purpose in the patient journey.
Office Tour Videos
This is the single most impactful video type for dental practices. A 60-90 second walkthrough of your office, from the front desk through the treatment areas, immediately demystifies the experience. Show your modern equipment, your comfortable chairs, your clean and welcoming environment. Narrate it yourself or have your office manager guide the tour.
Keep it simple: steady camera movement, good lighting, and natural conversation. Overly polished corporate videos can actually feel less trustworthy than authentic, slightly imperfect tours.
Meet the Team Videos
Short 30-60 second introductions from each team member build connection before the patient arrives. Include the dentist, hygienists, front desk staff, and assistants. Let each person share something personal — why they chose dentistry, what they enjoy about their role, or a fun fact about themselves.
Procedure Explainers
Educational videos that explain common procedures rank well in search and directly address patient concerns. Focus on the five to ten most common questions patients ask: What happens during a root canal? How long do veneers last? Is teeth whitening safe? Use animations or diagrams rather than graphic clinical footage.
Patient Testimonials
Authentic patient testimonials on video are significantly more persuasive than written reviews. A 30-second clip of a real patient describing their experience carries more weight than paragraphs of anonymous text. Always obtain written consent, and keep the testimonials focused on the experience rather than specific clinical outcomes.
The most effective dental videos are under 2 minutes. Attention drops sharply after 120 seconds, so front-load your key message and keep editing tight.
FAQ Response Videos
Record yourself answering the questions your front desk fields most frequently. Do you accept my insurance? How much does a cleaning cost? What should I expect at my first visit? These videos serve double duty: they rank in search results and reduce phone call volume for common inquiries.
Equipment and Setup
You do not need expensive equipment to produce professional-looking dental videos. Here is the minimum viable setup:
| Item | Budget Option | Professional Option |
|---|---|---|
| Camera | iPhone 14+ or recent Android flagship | Sony ZV-1 or Canon M50 |
| Audio | Wired lavalier mic ($15-25) | Rode Wireless GO II ($250) |
| Lighting | Window light + $30 ring light | Elgato Key Light ($150) |
| Stabilization | Phone tripod ($20) | DJI gimbal ($100-150) |
| Editing | CapCut (free) | Adobe Premiere Rush ($10/mo) |
The single most important investment is audio quality. Viewers will forgive slightly imperfect video, but poor audio makes any video unwatchable. A $20 lavalier microphone plugged into your phone dramatically improves audio quality over the built-in phone mic.
Filming Tips for Dental Offices
Dental offices present unique filming challenges: fluorescent lighting, clinical environments, and the need to balance professionalism with warmth. Here are practical tips that address each.
Lighting
Avoid overhead fluorescent lights as your primary light source — they create unflattering shadows and color casts. Position yourself near a large window for natural light, or use a ring light placed at eye level. If filming in treatment rooms, turn off the dental light and use your own lighting setup.
Background
Choose backgrounds that look professional but not clinical. The waiting room, a consultation room, or an office with books and plants work well. Avoid filming with clinical equipment, x-ray machines, or supply closets visible behind you.
Framing
Follow the rule of thirds: position yourself slightly off-center, with your eyes at the upper third of the frame. Leave some headroom but not too much. For office tours, use slow, steady movements — avoid jerky pans or rapid zooms.
Scripting vs. Spontaneity
For educational and explainer videos, use a bullet-point outline rather than a full script. Reading from a script sounds unnatural and kills the authenticity that makes video effective. Write down your three to five key points, practice them once, and then record. You can always do a second take.
For testimonials, provide your patient with two or three prompting questions rather than a script: What brought you to our practice? How was your experience? Would you recommend us? Let them answer naturally.
Where to Publish Your Videos
Creating video is only half the work. Distribution determines whether anyone actually sees it.
YouTube
YouTube is the second-largest search engine in the world and the most widely used video marketing platform at 82% adoption. Every dental practice should have a YouTube channel with organized playlists for office tours, procedure explainers, and patient testimonials. Optimize titles and descriptions with relevant keywords.
Google Business Profile
Upload videos directly to your Google Business Profile. These videos appear in local search results and can significantly increase engagement with your listing. GBP supports videos up to 30 seconds, so create dedicated short clips for this platform.
Your Website
Embed your best videos on key website pages. The office tour should live on your About page. Procedure explainers should be on their respective service pages. Testimonials work on both the homepage and a dedicated testimonials page. Use YouTube embeds to avoid hosting costs and loading speed issues.
Social Media
Repurpose longer videos into shorter clips for Instagram Reels, TikTok, and Facebook. A 5-minute procedure explainer can yield three to four 30-second clips, each highlighting a different key point. This multiplies your content output without multiplying your production effort.
Get AI-powered content ideas for your dental video strategy, including scripts, posting schedules, and performance tracking. Get started free →
Measuring Video Performance
Track these metrics to understand what is working and refine your strategy over time:
- View count: Basic reach metric. Aim for consistent growth month-over-month rather than viral spikes.
- Watch time: More important than views. If viewers drop off after 10 seconds, your hook needs work. If they watch 80%+, the content resonates.
- Click-through rate: For videos with calls to action (schedule a visit, call us), track how many viewers take the next step.
- Search impressions: In YouTube Studio and Google Search Console, monitor which queries surface your videos.
- Phone calls and bookings: Use unique phone numbers or UTM parameters to attribute new patient inquiries to specific videos.
HIPAA and Patient Consent
Patient privacy is non-negotiable. Before any patient appears in a video — even in the background of an office tour — you must have proper consent documentation in place.
Required Consent Elements
- Written authorization specifying how the video will be used (website, social media, advertising)
- Clear statement that participation is voluntary and will not affect their care
- Right to revoke consent at any time
- Description of what will be shown (face, name, before/after images, testimonial)
Safe Filming Practices
When filming office tours, schedule them before or after patient hours. If you must film during business hours, ensure no patient information is visible on screens, charts, or sign-in sheets. Brief your entire team on filming protocols so that no one accidentally captures protected health information.
For more details on compliance, see our guide on HIPAA-compliant dental marketing.
Video marketing sounds straightforward in theory. In practice, most dental teams film a few videos in their first week of enthusiasm, then stop. The practices that succeed treat video as a monthly discipline, not a one-time project. If you cannot commit 2-4 hours per month consistently, consider whether your time is better spent on intelligence-driven strategies that compound without constant content creation.
Frequently Asked Questions
How much should a dental practice spend on video marketing?
Most independent practices can produce effective video content for under $500 in initial equipment (smartphone, lavalier mic, tripod, ring light). Ongoing costs are primarily time — plan for 2-4 hours per week for filming and editing. If you outsource to a local videographer, expect $500-1,500 per session for 3-5 finished videos. Start with DIY content and invest in professional production for your cornerstone pieces like the office tour and key procedure explainers.
What types of dental videos get the most views?
Office tours consistently generate the highest engagement because they serve the broadest audience — anyone considering your practice. Procedure explainers for high-search-volume topics (teeth whitening, Invisalign, dental implants) tend to accumulate the most views over time through search traffic. Short-form content like before-and-after reveals and dental tips performs best on social media platforms. Patient testimonials have lower view counts but higher conversion rates.
Do I need to show my face in dental marketing videos?
You do not strictly need to, but it significantly increases effectiveness. Patients are choosing a person, not just a practice. Videos where the dentist speaks directly to the camera build the strongest trust and connection. If you are uncomfortable on camera, start with voiceover videos using animations or b-roll footage, and gradually work toward on-camera content as your confidence builds.
How often should I post dental videos?
Consistency matters more than frequency. One well-produced video per week is more effective than five rushed clips. For YouTube, aim for 2-4 videos per month. For social media (TikTok, Reels), 3-5 short clips per week is ideal but even 2-3 per week delivers results. Batch your filming — record 4-6 videos in a single session, then edit and release them on a schedule throughout the month.
Ready to see how your practice stacks up online?
Try it free →